
Accessing and using shared (resource) accounts
Many groups have a shared email account that is monitored by multiple staff. An example is enquiries@wbs.ac.uk .
In Outlook the easiest way to access and use these accounts is through Outlook Web Access.
- Start a browser and go to http://webmail.warwick.ac.uk
- Log in with your usercode (something like bsxxx)
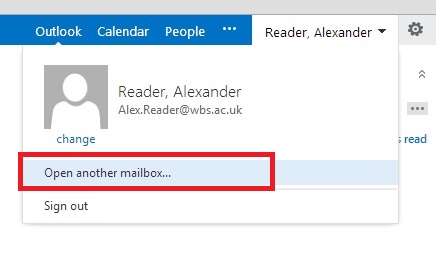
- Click your name in the top right hand corner and select the ‘Open Other Mailbox’ option
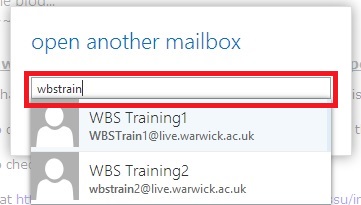
- Enter the resource account's username (in this example WBSTrain1). After the first time you access this account you will find this is auto-completes for you as you begin to type.
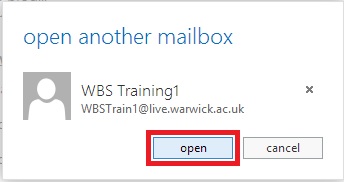
- Select the name of the resource account and click ‘Open’. If you get an error message contact the WBS Helpdesk (help@wbs.ac.uk) providing details of your username and the name of the Resource Account you are trying to access.
- You are now in the resource account. Any messages you send will come from that shared account and will be stored in the sent items of that account. If you get an error message the first time you try to send a message contact the WBS Helpdesk (help@wbs.ac.uk) including your username and the resource account from which you were unable to send.
- Repeat the process to change to another account or back to your own account.
I don't like web interfaces, why can't I access these accounts in the Outlook client?
If you really want to you can but please be aware of the following five limitations that do not make this our recommended option. Please contact the eSolutions helpdesk if you wish to add a resource account to your Outlook client.
In this example you are a member of a small team who support the Dean. You help manage his/her mailbox and reply to some messages on the Dean's behalf.
- If you use this option all of the items you send on behalf of the Dean will go into *your* sent items, not those of the Dean making it hard for each member of the team to know what work has been done and what is still outstanding.
- Each time you send a message you will need to remember to select the 'sender' account, e.g. your personal one or the Dean's in our example.
- The permissions necessary to enable such sending need to be deployed by the IT group and cannot be managed by end users making the process bureaucratic. Also you are not able to see who has access so it is hard for you to ensure only staff who need these permissions have them (e.g. if a staff member moves to a different post).
- You will need to have multiple signatures, one for your account and one for the shared account. For *every* message you send you will need to select the correct signature.
- Each person who will send from the shared account needs to create and maintain a shared signature. Should something about the shared account change (e.g. the Dean's telephone number) then each person will have to update their version of the shared signature.