
Sasami - a definitive notation for OpenGL 3D graphics
Sasami is an OpenGL-based 3D display engine for the Eden Empirical Modelling environment.
 |
 |
Introduction
Sasami is an extension to the "tkEden" empirical modelling environment which allows 3D graphics to be displayed using the OpenGL graphics API developed by Silicon Graphics and implemented on practically every platform in common use today. The OpenGL API allows the use of both software renderers, or dedicated 3D acceleration hardware such as that found in most consumer-level PCs today.
Conceptually, Sasami is designed to be a "thin" rendering layer - in other words, Sasami does not dictate how and what the model can do, but merely provides the interface to display 3D graphics. There are limitations to this, of course - some of which are dictated by the way Eden operates, and others by OpenGL.
Sasami is split into three distinct components - the parser, or "front end" engine, the update handler, and the renderer, or "back end" engine. A block diagram of the system shows how these sections interact with each other and the rest of Eden:
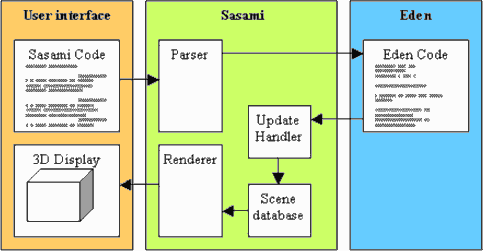
The parser
The parser is the side of Sasami which handles communication with the user. It simply takes Sasami statements and converts them into a series of Eden statements for processing. In this sense, the parser can be considered redundant - the user could write these Eden statements themselves, if they wished - the parser is simply there to make the job easier.
The update handler
The update handler is a series of call-back functions, which are accessible from within Eden itself. These are used to inform Sasami whenever one of the Eden statements created by the parser changes - for example, when Eden alters the co-ordinates of a vertex. The update handler then alters the scene database (a large data structure containing details of every 3D object to be shown), and tells the renderer to update the view to reflect this change.
The renderer
The renderer takes the scene database and draws it onto the screen using OpenGL. This step is the most complex, but also the most hidden from the user - Eden is completely unaware that this is going on, and all communication between Eden and the renderer is one way, via the update handler.
This three-part approach is similar to that used by the existing 2D libraries for Eden ("DoNaLD" and "Scout"), and requires only minor changes to the existing Eden codebase.
Command syntax and general notes
In order to enter Sasami commands, Eden must first be told to expect them. This is done using the normal notation-switch command - %, with the tag "Sasami" - hence
%sasami
will tell Eden that all following statements should be sent to the Sasami parser. To return to entering Eden statements, use:
%eden
In interactive mode, the command prompt will change to reflect the current notation.
All Sasami commands take the form:
<command> <parameters>
(note that there is no semicolon line terminator, unlike in Eden statements - this is similar to the DoNaLD notation)
The Sasami parser considers all whitespace characters (space and tab), as well as commas to be command/parameter separators - therefore, all of the following are equivalent:
vertex test 1 2 3
vertex	test	1	2	3
vertex	test	1,2,3
vertex,test,1,2,3
It is up to the individual which style you use - I personally find that different styles suit different tasks, particularly as when laying out large blocks of similar statements it is useful to line up parameters in columns. Sasami commands are not case-sensitive, but variable names and other parameters are (as they are used within Eden, and Eden is case-sensitive).
Unless noted otherwise, Sasami statements take a fixed number of parameters and will generate an error if not passed the right number. Also please note that, whilst the object-creation logic is reasonably intelligent and can often cope with objects declared after their use, it is not a good idea to rely on this!When using Sasami notation, there are a couple of additional features as well as the normal commands. Firstly, the hash symbol ("#") is used to delineate comments - after a hash is encountered the remainder of that line of input is ignored. Secondly, any line starting with a dash character ("`") (on UK PC keyboards, this is the character obtained by pressing the key immediately above the TAB key in the top-left of the keyboard, on Sun keyboards this is usually at the top right) will be taken as an Eden statement as passed to the Eden parser directly. This behaviour is the same as the "?" operator in DoNaLD, and allows for small blocks of Eden code to be included without the need to switch notations. E.g.:
# The following two lines are in Eden notation
`b = 4.0;
`a is b+1;
# Now we're back in Sasami notation
As well as commands, Sasami also provides some Eden variables which
can be modified directly, such as sasami_show_axes. These
can be modified using Eden statements as normal:
%eden
sasami_show_axes=0; /* Turn off the axes indicators */
Sasami makes uses of UIDs, or Unique IDentifiers, to specify vertices, polygons, objects and any other structure which needs to be referenced from within Eden as well as Sasami. UIDs are simply integer values generated internally and returned to the model as the result of some commands. For example, the command:
vertex test 1 2 3
Generates a UID for the vertex, creates an Eden variable called "test", and sets it to the UID. This means that if you then specify this vertex in another command:
poly_geom_vertex poly test
Sasami can retrieve the UID and find the vertex in the scene database. This applies to all Sasami identifiers. It is possible to perform some simple manipulation on these UIDs within Eden (such as assigning them to a new variable) - however, more complex alteration is highly inadvisable, as there is no guarantee that Sasami will generate UIDs in a fixed sequence, or, indeed, will not reuse UIDs (once the object they refer to has been destroyed, obviously). This is not the case at present, but future versions may be different!
Command parameters which are not UIDs are passed to Eden for evaluation - therefore they can be anything that Eden will accept as an expression. This means that all of the following are legal:
vertex test 1 2 3
vertex test a b c
vertex test (a+10)/20 (c-20) 0.0
Sasami will internally generate statements similar to the following from these (taking the last example):
vertex_test_x is (a+10)/20;
vertex_test_y is (c-20);
vertex_test_z is 0.0;
This is the basis on which 3D data can be linked to models - simply specify variables or expressions from your model as parameters to the appropriate functions.
Note: Sasami uses the double type for value storage internally, but will automatically convert from both Eden float and integer types if necessary. On most systems, a double is a 64-bit floating-point value, whilst Eden's float (which is mapped to the real C type) is a 32-bit floating-point value and integer (mapped to int) is a 32-bit integer. The use of double is mainly to preserve accuracy during internal calculations, and for compatibility with OpenGL (which uses double internally).
The following is a reference to all of the Sasami commands and variables available for models to use.
open_display
Description: This command opens the Sasami display window (and initialises the OpenGL driver in order to do it)
Syntax: open_display
Notes: Only one display window can be open at any one time, and
Sasami keeps track of the current viewport state - hence duplicate
calls to open_display will have no effect. Use
close_display to close the viewport. By default, the
viewport dimensions are 640x480. See the viewport command
for details on how to change this.
Example: open_display
close_display
Description: This command closes the Sasami display window (and shuts down the OpenGL driver in order to do it)
Syntax: close_display
Notes: Sasami keeps track of the current viewport state, and hence
duplicate calls to close_display will have no effect. Use
open_display to open the viewport.
Example: close_display
vertex
Description: The vertex command is used to create a
new vertex at a given set of co-ordinates.
Syntax: vertex <vertex name> <x> <y> [z]
Notes: The Z co-ordinate is optional - if not specified, the Z will be assumed to be 0. This is useful when specifying texture co-ordinates, where only the X and Y co-ordinates are relevant.
Example: vertex test_vertex 0.4 3 4
polygon
Description: The polygon command is used to create a
new polygon. Initially, the polygon has the default material (white),
and contains no vertices.
Syntax: polygon <polygon name>
Example: polygon test_polygon
poly_geom_vertex
Description: This command adds vertices to a polygon. Polygons can contain an infinite number of vertices - however, all of these vertices must be coplanar (they must all lie in a common plane), and the polygon must be convex (that is, no interior angle of the polygon can be greater than 180 degrees). Sasami does not test for either of these, neither does OpenGL - you may get unpredictable results if a degenerate polygon is formed.
Any number of vertices can be specified with this command, up to the maximum length of an input line (which is set at 256 characters by default).
Syntax: poly_geom_vertex <polygon name> <vertex names>
Notes: Polygons with only one vertex are not rendered, whilst polygons with two appear as a line. Lines are not light-sourced, as three vertices are required to calculate a plane normal for the lighting algorithm.
When rendering, vertices are traversed in the order they are added to the polygon. Polygons are one-sided, and the order or winding of the vertices determines which side is visible. The side of the polygon which is visible is that where the vertices describe an anticlockwise circle.
To create a two-sided polygon, create two polygons using the same vertices but with the order reversed.
Example: poly_geom_vertex test_polygon test_vertex_1 test_vertex_2
poly_tex_vertex
Description: This command adds texture vertices to a polygon. The texture vertices define the UV (UV-coordinates are the X and Y coordinates of a point within the texture. By convention, the X co-ordinate is renamed U and the Y-coordinate becomes V when referring to a 2D texture co-ordinate) coordinates on the texture that correspond to the vertices on the 3D object. These vertices should be defined in the same order as the geometry vertices they correspond to. Any number of vertices can be specified with this command, up to the maximum length of an input line.
Syntax: poly_tex_vertex <polygon name> <vertex names>
Notes: Only the X and Y coordinates of texture vertices are relevant - the Z coordinate is ignored. If no texture vertices are defined for a polygon, Sasami generates texture co-ordinates automatically. However, these will almost certainly not be what you want - they are just provided so that something will be displayed in this case.
Example: poly_tex_vertex test_polygon tex_vertex_1 tex_vertex_2
poly_colour
Description: This command sets the basic colour of a polygon. The basic colour is only used if there is no material assigned to the polygon.
Syntax: poly_colour <polygon name> <r> <g> <b> [a]
Notes: This command is only provided for building simple models and quick prototyping - it is recommended you use materials under normal circumstances as these provide better control over polygon colours, texturing and lighting. Colours are specified in RGBA format, with a value range of 0.0-1.0. The alpha value specifies the transparency of the polygon, where 0 is completely transparent (invisible) and 1 is complete opaque. If an alpha value is not given, 1.0 is assumed.
Example: poly_colour test_polygon 1.0 0 0.5
poly_material
Description: This command assigns a material to a polygon.
Syntax: poly_material <polygon name> <material name>
Notes: This is rather clumsy at present as there is no easy way to assign a material to multiple polygons.
Example: poly_material test_poly test_mat
material
Description: This command creates a new material. The material is initially set to a default white colour with no texture.
Syntax: material <material name>
Example: material test_mat
material_ambient
Description: This command sets the ambient colour of the given material. The ambient colour is the colour the material appears in darkness.
Syntax: material_ambient <material name> <r> <g> <b> [a]
Notes: The colour is specified as an RGBA value, of range 0.0-1.0. The alpha value is optional, and assumed to be 1.0 if omitted.
Example: material_ambient test_mat 0.2 0.2 0.4
material_diffuse
Description: This command sets the diffuse colour of the given material. The diffuse colour is the "real" colour of the material - i.e. that seen under normal lighting.
Syntax: material_diffuse <material name> <r> <g> <b> [a]
Notes: The colour is specified as an RGBA value, of range 0.0-1.0. The alpha value is optional, and assumed to be 1.0 if omitted.
Example: material_diffuse test_mat 1.0 0.6 0.3
material_specular
Description: This command sets the specular colour of the given material. The specular colour is the "highlight" colour of the material - i.e. the colour the shiny areas of the material appear when subjected to direct light.
Syntax: material_specular <material name> <r> <g> <b> [a]
Notes: The colour is specified as an RGBA value, of range 0.0-1.0. The alpha value is optional, and assumed to be 1.0 if omitted. To make a completely matte (i.e. not shiny) material, make the diffuse and specular colours the same.
Example: material_specular test_mat 1.0 1.0 0.8
material_texture
Description: This command sets the texture to be used on a given material. The texture may be either specified as a filename contained in quotes, or as the name of an Eden string variable containing a filename.
Syntax: material_texture <material name> <texture name>
Notes: Sasami can only load textures in PNG ("Portable Network
Graphic" - a format devised to replace the old CompuServe GIF
("Graphics Interchange Format") for use on the Internet) format
files. All channels of the file are loaded, including alpha channels
if present. We recommend that filenames do not contain spaces, for
ease of portability to many platforms. If a fully-qualified path is
not specified, the path will be assumed to be relative to the current
working directory. For a texture to display properly on a polygon,
texture vertices must be defined - see poly_tex_vertex.
Example:
	material_texture test_mat "sasami.png"
	`test_mat_filename = "sasami.png"
	material_texture test_mat test_mat_filename
object
Description: This command creates a new object.
Syntax: object <object name>
Example: object test_obj
object_poly
Description: This command attaches the given polygon(s) to the object.
Syntax: object_poly <object name> <polygon names>
Notes: Polygons will not be displayed until they have been attached to an object. Polygons can be attached to as many objects as you want, but note that any changes to the polygon will affect all of the objects, not just one.
Example: object_poly test_obj test_poly1 test_poly2
object_pos
Description: This command sets the position of an object.
Syntax: object_pos <object name> <x> <y> <z>
Notes: This command sets the position in 3D space of an object. This affects the centre point (or the 0,0,0 point) of all the polygons in the object, effectively transforming them all together as this value changes. Note that this does not actually alter the polygons themselves - merely where they appear when rendered. Using object transformations rather than polygon transformations is recommended wherever possible, as object transformations are effectively "free" (as they are performed by OpenGL, and may well be executed by dedicated transformation hardware), whilst altering polygons incurs quite a large performance penalty as a large number of Eden definitions are updated.
Example: object_pos test_obj 2 3 4
object_rot
Description: This command sets the rotation of an object.
Syntax: object_rot <object name> <x> <y> <z>
Notes: This command sets the rotation in 3D space of an object, in degrees. This affects the centre point (or the 0,0,0 point) of all the polygons in the object, effectively transforming them all together as this value changes. Note that this does not actually alter the polygons themselves - merely where they appear when rendered. Using object transformations rather than polygon transformations is recommended wherever possible, as object transformations are effectively "free" (as they are performed by OpenGL, and may well be executed by dedicated transformation hardware), whilst altering polygons incurs quite a large performance penalty as a large number of Eden definitions are updated. Rotations precedence is in the order X, Y, Z.
Example: object_rot test_obj 2 3 4
object_scale
Description: This command sets the scale of an object.
Syntax: object_scale <object name> <x> <y> <z>
Notes: This command sets the scale of an object on each of the three axes. This scales every polygon in the object about the centre (0,0,0) point. Note that this does not actually alter the polygons themselves - merely where they appear when rendered. Using object transformations rather than polygon transformations is recommended wherever possible, as object transformations are effectively "free(as they are performed by OpenGL, and may well be executed by dedicated transformation hardware), whilst altering polygons incurs quite a large performance penalty as a large number of Eden definitions are updated.
Example: object_scale test_obj 2 3 4
light
Description: This command creates a new light.
Syntax: light <light name>
Example: light test_light
light_pos
Description: This command sets the position of a light in the world.
Syntax: light_pos <light name> <x> <y> <z>
Example: light_pos test_light 1 2 3
light_enabled
Description: This enables or disables a light. Setting the light state to 1 will enable it, 0 will disable it.
Syntax: light_enabled <light name> <light state>
Notes: Disabled lights have no effect on the scene, but still exist in the scene database and can be re-enabled with this command.
Example: light_enabled test_light 1
light_directional
Description: This sets if a light is directional or positional. A value of 1 indicates a directional light, whilst a value of 0 indicates a positional light. Positional lights have an actual "position" in the scene, whilst directional lights are assumed to be infinitely distant to the scene, with the direction of their light being determined by the values given for their position.
Syntax: light_directional <light name> <light state>
Notes: See the OpenGL Red Book for a more complete description of directional and positional lights, and how directional light positions can be manipulated.
Example: light_directional test_light 1
light_attenuation
Description: This sets the attenuation factor for a light source.
Syntax: light_attenuation <light name> <attenuation factor>
Notes: If the attenuation factor is 0, then the light will have no attenuation. Otherwise, the value represents a linear attenuation factor (see the OpenGL Red Book, GL_LINEAR_ATTENUATION, for a description of how linear attenuation functions).
Example: light_attenuation test_light 0.6
light_ambient
Description: This command sets the ambient colour of the given light.
Syntax: light_ambient <light name> <r> <g> <b> [a]
Notes: The colour is specified as an RGBA value, of range
0.0-1.0. The alpha value is optional, and assumed to be 1.0 if
omitted. See material_diffuse,
material_ambient, and material_specular for
more details on the lighting/material model.
Example: light_ambient test_light 1.0 0.6 0.3
light_diffuse
Description: This command sets the diffuse colour of the given light.
Syntax: light_diffuse <light name> <r> <g> <b> [a]
Notes: The colour is specified as an RGBA value, of range
0.0-1.0. The alpha value is optional, and assumed to be 1.0 if
omitted. See material_diffuse,
material_ambient, and material_specular for
more details on the lighting/material model.
Example: light_diffuse test_light 1.0 0.6 0.3
light_specular
Description: This command sets the specular colour of the given light.
Syntax: light_specular <light name> <r> <g> <b> [a]
Notes: The colour is specified as an RGBA value, of range
0.0-1.0. The alpha value is optional, and assumed to be 1.0 if
omitted. See material_diffuse,
material_ambient, and material_specular for
more details on the lighting/material model.
Example: light_specular test_light 1.0 0.6 0.3
load_full_obj
Description: This command loads the entire contents of a Lightwave format OBJ file into a series of Sasami objects.
Syntax: load_full_obj <name prefix>
Notes: This command is identical to the load_obj
command, with the exception that it creates Eden definitions for all
of the items in the OBJ file (including polygons and vertices). This
uses a very large amount of RAM and CPU time, and hence this command
should be avoided unless you actually want to manipulate objects at
very low levels - otherwise use load_obj instead. As the Lightwave
file is parsed, Sasami objects are created with the following names
(the prefix is specified in the load_full_obj command, whilst the rest
of the names are read from the OBJ file):
	Vertices :	<prefix>_v_<vertex number>
	Texture vertices :	<prefix>_vt_<vertex number>
	Objects :		<prefix>_<object name>
	Polygons	<prefix>_p_<polygon number>
	Materials :	<prefix>_mat_<material name>
The OBJ file numbering systems start from index 1 and counts up. If a fully-qualified file path is not given, the path relative to the current working directory will be used.
Example: load_full_obj test "test.obj"
load_obj
Description: This command loads the contents of a Lightwave format OBJ file into a series of Sasami objects.
Syntax: load_obj <name prefix>
Notes: This command is identical to the load_full_obj
command, with the exception that it only creates Eden definitions for
the objects and materials in the input file - the rest of the data is
only loaded into Sasami's scene database. This avoids the massive
overheads associated with loading the entire file contents into Eden,
but still allows the file to be displayed and manipulated at the
object/material level. If you need to manipulate individual polygons
or vertices in an object, then use the load_full_obj
command. As the Lightwave file is parsed, Sasami objects are created
with the following names (the prefix is specified in the load_full_obj
command, whilst the rest of the names are read from the OBJ file):
	Objects :		<prefix>_<object name>
	Materials :	<prefix>_mat_<material name>
The OBJ file numbering systems start from index 1 and counts up. If a fully-qualified file path is not given, the path relative to the current working directory will be used.
Example: load_obj test "test.obj"
bgcolour
Description: This command sets the background colour of the Sasami display viewport.
Syntax: bgcolour <material name> <r> <g> <b>
Notes: This is merely a helper function - the same effect can be
achieved by setting the three Eden variables
sasami_bgcolour_r, sasami_bgcolour_g and
sasami_bgcolour_b.
Example: bgcolour 0.0 6.0 1.0
viewport
Description: This command sets the size of the Sasami viewport.
Syntax: viewport <x size> <y size>
Notes: Setting the viewport size to very large values will probably
cause a crash, as the OpenGL drivers will attempt to create a surface
too large for the available framebuffer RAM (the exact point at which
this will occur is dependent on the OpenGL driver and hardware,
although it should not cause a problem, as any window larger than the
current screen resolution would be just a little pointless anyway). If
the viewport is open when the viewport size changes, then the viewport
will be closed and re-opened. This function is merely a helper which
sets the sasami_viewport_xsize and
sasami_viewport_ysize variables. By default the viewport
size is 640x480.
Example: viewport 800 600
Sasami variables
The following entries are not Sasami commands, but rather Eden variables that Sasami creates (and monitors). They can be referenced and changed simply by issuing appropriate Eden statements - e.g.:
sasami_viewport_xsize=800;
viewport_aspect_ratio is sasami_viewport_xsize/sasami_viewport_ysize;
If you are in the Sasami context, don't forget to put a "`" character in front of any Eden statements (or use "%" to switch contexts).
sasami_viewport_xsize, sasami_viewport_ysize, sasami_viewport_bpp
Description: These three variables give the dimensions and colour depth of the Sasami display viewport, in bits per pixel. The xsize and ysize variables may be changed, but the colour depth is read-only (as it is determined by the colour depth of the user's desktop).
Notes: Setting the viewport size to very large values will probably
cause a crash, as the OpenGL drivers will attempt to create a surface
too large for the available framebuffer RAM. If the viewport is open
when the viewport size changes, then the viewport will be closed and
re-opened. The helper function viewport is provided to
make setting these variables easier. By default the viewport size is
640x480.
sasami_bgcolour_r, sasami_bgcolour_g, sasami_bgcolour_b
Description: These three variables give the R, G and B components of the display viewport background colour.
Notes: The helper function bgcolour can be used to
easily set these variables.
sasami_show_axes
Description: This variable determines if the axes indicators (unit length wireframe arrows along each of the axes) are displayed. The red arrow points along the X+ axis, the green arrow along the Y+ axis, and the blue arrow along the Z+ axis. If the value is 1, the indicators are shown. If 0, they are not.
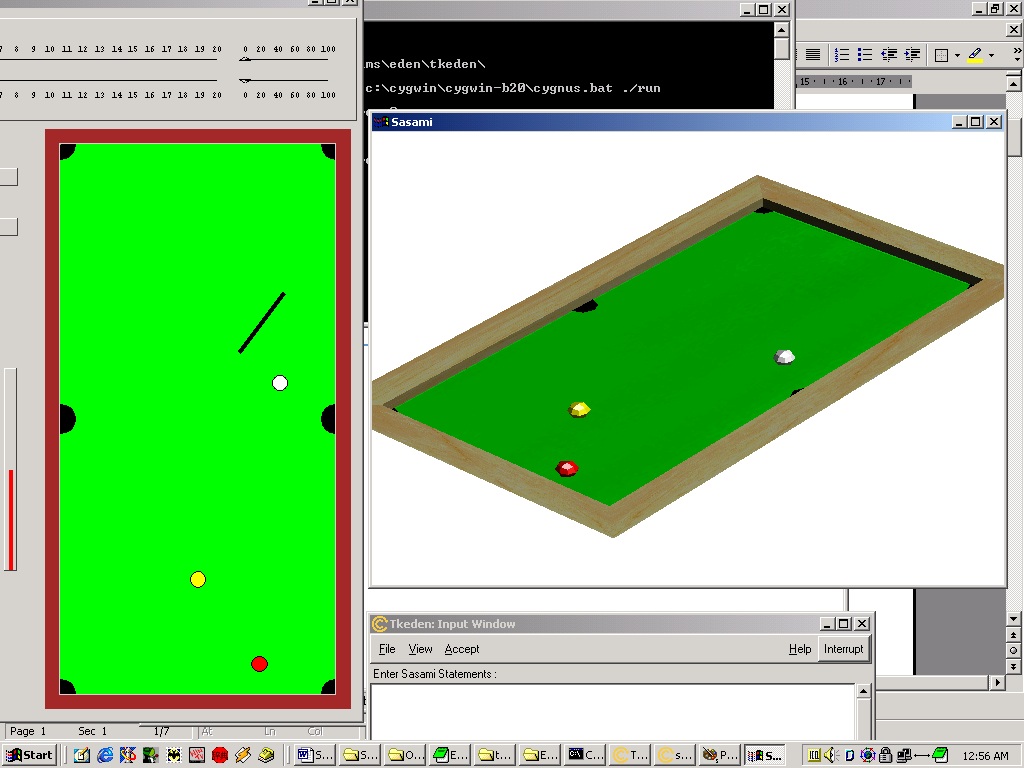
Appendix A : A simple example Sasami script
The following code is a simple annotated script to give an idea of
how to use Sasami, demonstrating all the basic principles. It simply
creates a cube with a texture map on it, and then scales and rotates
that cube. The size of the cube can be changed by modifying the Eden
variables cube_size, cube_front_size, and
cube_back_size.
%sasami

# Set up our viewport dimensions

viewport 640 480

# Open the viewport

open_display

# Set the background colour

bgcolour 0 0.6 1 		# RGB - Light blue

# Cube variables

# Note the preceding ` that indicates that these are Eden statements

`cube_size=1;
`cube_front_size is cube_size;
`cube_back_size is cube_size;

# Vertices

vertex blf 	-cube_front_size 	-cube_front_size 	cube_size
vertex brf 	cube_front_size 	-cube_front_size 	cube_size
vertex trf cube_front_size 	cube_front_size 	cube_size
vertex tlf 	-cube_front_size 	cube_front_size 	cube_size

vertex blb 	-cube_back_size 	-cube_back_size 	-cube_size
vertex brb 	cube_back_size 	-cube_back_size 	-cube_size
vertex trb cube_back_size 	cube_back_size 	-cube_size
vertex tlb 	-cube_back_size 	cube_back_size 	-cube_size

# Texture co-ordinates

vertex tl 0 0
vertex tr 1 0
vertex br 1 1
vertex bl 0 1

# Polygons

polygon front,back,top,bottom,left,right

poly_geom_vertex front blf,brf,trf,tlf
poly_tex_vertex front tl,tr,br,bl

poly_geom_vertex back blb,tlb,trb,brb
poly_tex_vertex back tl,tr,br,bl

poly_geom_vertex left blb,blf,tlf,tlb

poly_geom_vertex right brb,trb,trf,brf

poly_geom_vertex top tlf,trf,trb,tlb

poly_geom_vertex bottom blf,blb,brb,brf

poly_colour front 	0 1 0 1
poly_colour back  	1 0 0 1
poly_colour top   	1 1 1 1
poly_colour bottom	1 1 1 1
poly_colour left		0 0 1 1
poly_colour right		0 0 1 1

# Wrap the cube up as an object

object cube

object_poly cube front,back,top,bottom,left,right

# Move and distort the cube a bit

object_pos cube 0.8 0.2 -0.4
object_rot cube 120 73 43
object_scale cube 0.8 1.4 0.6

# Set up a material and texture the front and back of the cube

material testmat

material_ambient testmat 0.5 0.5 0.5
material_diffuse testmat 0.8 0.8 0.8
material_specular testmat 1 1 1
material_texture testmat "test.png"

poly_material front testmat
poly_material back testmat
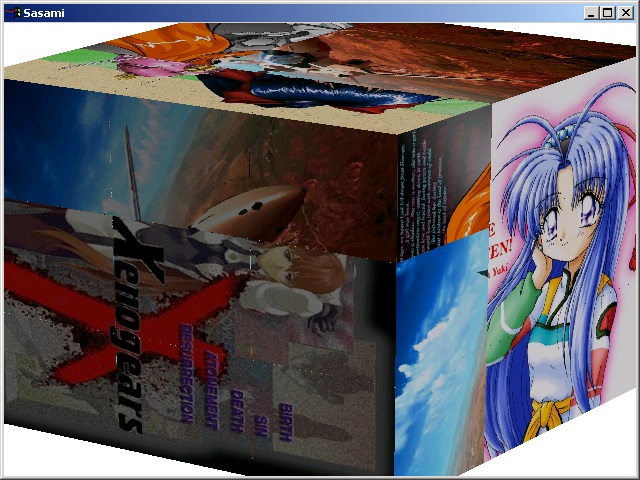
 |
(In case you're wondering about the girl, that's the "real" Sasami - a character from the anime series "Tenchi Muyo!". I bet you wish you hadn't wondered now. ^-^) |
Manual originally written by Ben Carter and lovingly restored from the mess that Microsoft Word made into a sensible web form by Ashley Ward in June 2001. Imported into SiteBuilder by Ashley Ward, April 2005. Images slightly improved by Ashley Ward, 11 July 2005.
(Note: this document was originally titled "The Sasami User Guide".)