
Quick guide to print
For advice on all aspects of printing and print management, you should in the first instance contact Warwick Print. If it is a digital print job (see explanation below), Warwick Print will complete the job, as they are Warwick’s preferred suppliers for digital print. They will advise on the best choice of printers and outsource the work if they cannot fulfil it themselves e.g. litho work and work requiring special finishes (more information below).
Litho or digital?
Pagination, folding and binding
Paper
Special finishes
Litho or digital printing?
This is an important decision to make upfront because it will determine whether Warwick Print can undertake the work or whether it needs to be outsourced. It will also affect how the designer sets up the job and the cost of the print itself. Warwick Print can help you to make this decision, based on factors such as size of publication and length of print-run.
Lithographic or litho printing involves making a ‘plate’ (a metal template) for each page, which attracts different colours of ink to different areas on the page. Each colour of ink – cyan, magenta, yellow and black (referred to as CMYK) is applied to the paper one after the other in quick succession, and each section of the publication is printed separately, so all the covers will be run off in one go for example.
Because each section of the publication is printed separately based on a plate, the quality of colour and finish is consistently high. Because the ink is pulled onto the page where needed, no remnants of ink from a previous section are transferred onto the paper. Sometimes colour can appear slightly less vibrant with litho printing because the ink is drawn further into the paper rather than coating the surface of the paper, but the extent of this depends on paper choice and on your colour palette of colours.
If you are producing a small quantity of a publication, litho printing isn’t economical because much of the cost is due to the set-up of the job – making the plates, setting the ink levels etc. So the higher the quantity, the more economical it becomes and you’ll find that the difference between say 55,000 and 60,000 copies is relatively small.
You may choose to print in either 2 colour (black plus another 'spot' colour – if you are printing on white paper, white is the absence of colour rather than a colour in its own right) or 4 colour, using all four inks to produce any other colour. But litho printing provides the flexibility to add a fifth ‘special’ or ‘spot’ colour if you want to add a colour that can’t easily be created using the four-colour process. This could include a metallic colour. An example of a spot colour is Warwick’s ‘Cool Grey 11’ in our brand palette. This produces a grey that’s clearer and more consistent in colour than a grey created from a tint of black.
Digital printing follows exactly the same process as a standard office printer, but just on a larger scale and at a higher quality. The document is sent to print, the printer interprets the digital information in the file and reproduces that on the paper. Rather than each section being printed separately and then the sections being bound together, as in litho printing, each copy of the document is printed in one go. All the inks (cyan, magenta, yellow and black) are ‘stamped’ onto the surface of the paper, meaning that you can obtain vibrant colours. The set-up time (and costs) are lower than with litho printing. However, the cost per page is more expensive.
The quality of digital printing is improving all the time as technology evolves. More modern presses use digital inks, which produce printing of a higher quality than the standard ‘toner’ powders. Because all the colours are made using CMYK, there isn’t an option to add special/spot colours.
Because each copy of a document is printed as a standalone, you can also customise content so
that only certain sections of the document are printed, or so that a person’s name appears on the cover. However, this needs the printer to have the software and for you to supply them with the necessary data.
Litho
Pros: Very high quality, faster and cheaper for higher quantities, option to add special/spot colour(s), good economies of scale
Cons: Large set-up time/costs mean not economical for smaller quantities, if you want to stop printing to make a change you’ll need to start again with new plates at extra cost (N.B. If you think there’s any chance you may want a reprint in the near future, ask the printer if they can retain the plates to avoid paying to reproduce them)
Digital
Pros: Quality improving (but hardware varies between printers), fast turn-around and economical for smaller jobs because negligible set-up costs, content can be customised if you have the data and the printer has the software, you can stop a job to make changes to content if necessary and reprints don’t incur extra set-up costs, colour very vibrant
Cons: Quality and consistency not as good as litho, no option to add spot colour(s), cost per page is higher so no economies of scale
 Pagination, folding and binding
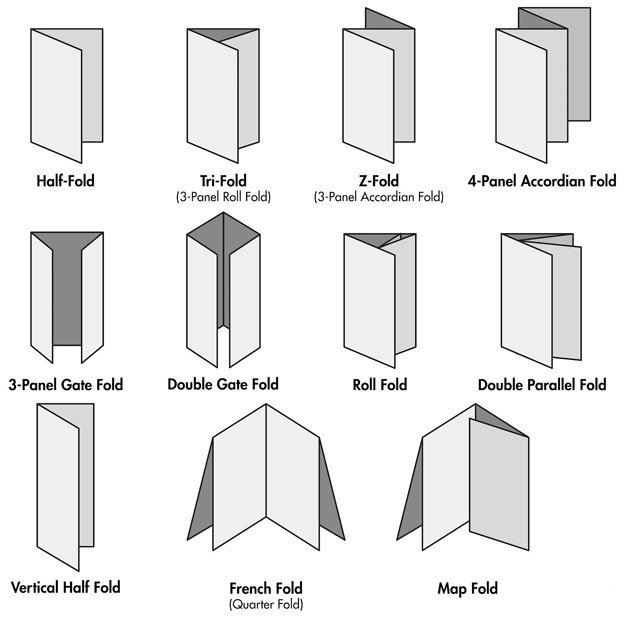
Pagination (shortened to pp) refers not to the number of pieces of paper, but to the number of readable/printable pages i.e. one piece of paper folded in the centre will give you 4pp – two pages on the front and two on the back. If you’re producing a flier or small leaflet, it will most likely consist of a single sheet of paper, folded according to how you want it to open out. The pagination will therefore depend on how many times and in what way the paper is folded (see below for some common examples), but it will always be divisible by two.
If you’re producing a document of more than 4pp, it can be bound together in different ways. Saddle stitching is well suited to smaller documents and involves pieces of paper that are folded once in the centre (each piece of paper will be 4pp) being slotted on top of each other, starting with the centre of the document and working outwards, before being ‘stitched’ together with thin metal wire. For larger brochures and documents like prospectuses, a group of these 4pp pieces of paper are collated in the correct sequence and glued together to form a ‘section’, often 16pp in size. These sections are then bound together to make the finished document.
Warwick Print can advise on the best binding process for your document. Bear in mind though that if your document is more than 4pp and is going to be saddle stitched or perfect bound the pagination must be divisible by four. The exception to this are wire-o binding, where single sheets of paper (either single or double-sided) can be inserted into the wire loops that bind them together.
Paper
There are three main considerations when choosing paper: size, stock and weight (thickness).
Paper size
You're probably familiar with the ISO A series - A1, A2, A3, A4, A5 etc. but there are lots of other standard formats so talk to your printer. Standard formats are cheaper because you're buying paper that is ready made. On a litho printer this comes in rolls that pass through the printer and then are then cut to form individual pages once a section has printed. With digital printing they are normally single sheets to start with. You can request a custom-made paper size for litho printing but this will cost more.
Paper stock
Paper is available in two main types: coated and uncoated.
Coated papers are named and priced according to the finish: Matt, satin, silk, art and gloss. As the name suggests, coated papers have a coating applied to the surface of the paper to produce a certain look and texture. Coated stock feels smoother to the touch than uncoated and because the ink sits on top of the coating, you'll get a more vibrant colour than on uncoated. However ink can take longer to dry and some coatings, such as matt laminate, can mark easily. This can be combatted by adding a sealant on top of the coating.
Uncoated stock has an expensive feel and is often thought to imply quality. It is more expensive than most coated stock, and is often preferred for print publications that are seen as less disposable. For example, most magazines and flyers are printed on silk or gloss, but a university prospectus or degree certificate is more likely to be on uncoated stock. The ink sinks further into uncoated stock meaning that colours can seem slightly less vibrant. To combat this, Pantone colours (professional colour references) for uncoated stock are made up of a different proportion of the four ink colours – CMYK – than those for coated stock. You can also boost vibrancy by asking your designer to use the brighter colours from the brand palette. Ink dries more quickly on uncoated stock, meaning special finishes can be applied soon after printing.
Paper weight
The thickness (or weight) of paper is measured in gsm, which stands for grams per square metre). Weights for paper range from 40-170 gsm. Above 170gsm, paper is referred to as ‘board’. Often the inside pages of a document will be in paper/board of a lower gsm than the cover.
Special finishes
To make your print document really stand out, you can ask for special finishes to be applied after printing. Warwick Print will help you liaise with litho printers to find out what might work and how much it will cost. Special finishes can be quite costly and will take extra time to complete once the normal printing process is completed, so are often reserved for use on covers or areas where they will have the most impact.
Examples of special finishes include:
Foiling blocking – stamping/pressing foil onto the paper in a set design. It could be used to stamp text, an image or a shape onto your publication and foil can is available in many different colours or clear. Our 2017 prospectuses use clear foiling on the foot of the covers and on the text on the inside front cover. Clear foil adds a shiny effect similar to spot UV gloss (see below)
Matt laminate and spot UV gloss – adding areas of matt or gloss finish to pick out details in your design and add texture. Spot UV gloss doesn’t sit well on all types of paper. Clear foil (see above) may be an alternative. Warwick Print can talk to whoever is doing the finishes about the best options.
Die-cutting – cutting out windows or shapes around the edges of a piece of paper. This process is automated and can be quite intricate, but bear in mind likely wear and tear of people using the document.
Embossing and debossing – raising (embossing) or lowering (debossing) areas of the page so they sit above or below the surface of the rest of the page, creating highlights and texture